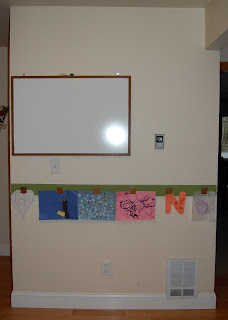
The kids bring home a lot of art work each week from school and while I love to see it all and I'm okay to enjoy it briefly I don't need it all over the entire house. We have an awkward wall in our kitchen eating area that has always bothered me. It sticks out into the eating area right past the kitchen and could be great for hanging a picture on. I spent several years before we had kids looking for the perfect kitchen hutch to put there until I realized that anything that had any depth to it would narrow the walking space too much. A major issue with this wall is the amount and placement of the utilities features in the wall. It has a light switch and an outlet which are standard and not too much of an issue but the real trouble is the heater unit and its controls which really make it hard to use this wall effectively. We don't even use the heater unit and we have talked about removing them but the thought of a drywall project or two along with baseboard replacement stop us from moving forward.
I used to have a round candle holder that held tea lights on this wall but after the millionth time someone walked too close and knocked it off the wall I moved on. We then went through a big Pictionary phase so the whiteboard took up permanent residence on the wall. Then along came the kids and their art projects and before I knew it the wall was constantly covered in some sort of art. Leading to a very cluttered look and one that didn't force removal of older art. Time for a change!
I found a very easy tutorial online that walked me through this project. Overall, it cost about $10 and took me about an hour of actual work time. I sanded down a piece of cedar untreated decking so there were no slivers. Then I painted it green, it took two coats to get full coverage. After letting it dry I used the sandpaper again to distress the edges of the board and then Matt helped me mount it on the wall with two screws which I patched and painted over. I then measured out where the clips should go and glued them on with liquid nails. Lessons learned - glue the clips on before you mount on the wall so they won't slide off. Overall, this has been a great success. The kids have a place to display their art. They each get three clips and they have to either recycle the old art or put it in a special box just for art in their closets.
I've got a lot more project ideas in my head, I just need to decide on what's next and keep on decluttering. That is if I don't head outside to tend to my gardens... the yard is starting to call to me more than the clutter inside.


1 comment:
This is genius. Something like this might be in my future.
Post a Comment